Running the Plug-insIn order to use the plug-ins you need to install and run the “Ellipse” program. All ellipse plug-ins necessary for immunogold pattern evaluation are placed in the menu Plug-in>Ellipse>Gold. The recommended order for image evaluation is given in the following chart: Step 1. Open image(s) of interest. Go to File>Open>Single file… or Multiple files… Step 2. Smoothen image(s) in order to remove noise and facilitate the detection of gold particles. Important: this step is not obligatory in case you have images without significant noise. Go to Plug-in>Ellipse>Processing>Smooth 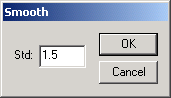 Plug-in “Smooth” has the Std parameter already preset to 1.5 and immediately gives a preview. Std set between 1 and 2 is usually useful and safe for the TEM images, however if you are not satisfied with the result, try several different Std-s. (In order the input parameter would take effect, press “Enter”). The parameter must be high enough to remove the noise artifacts, but not too high to prevent detection of the small objects. Click OK in order to leave the changes or Cancel in order to return to the original image. Step 3. Detect gold particles. Go to Plug-in>Ellipse>Gold>Detection 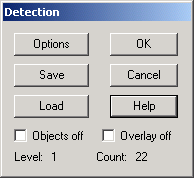 The plug-in works with 8-bit grayscale images, either single or multiple (in stack). It will immediately detect all dark areas in accordance with actual settings and mark them with different overlay colors. It also chooses which of these areas belong to corresponding objects size group (i.e., gold particles of various sizes; 3 groups are possible) and mark them with crosses (small), triangles (medium) or squares (large). In main window (named “Gold detection”) you can also switch on or off marking of objects (“Objects off”) and overlay image of detected areas (“Overlay off”). This feature can help you in setting the correct parameters of the objects detection. If you are satisfied with the objects detection, press OK. Before this you can also save settings in order to use them later again (“Save” button). After exiting the plug-in, you can also save the objects. If you want to exit the Plug-in without any changes, press “Cancel”. To obtain reasonable results, it is necessary (at least for new set of images) to change the parameters in window “Options” (there is no automatic parameters setting). Press the button “Options”. In the opened window you can choose between sheets “Threshold” and “Objects”:  Using corresponding sliders in the sheet “Threshold”, change threshold (the recognition is done by selection of regions with low gray level intensity; slider 1) and top-hat (another type of detection, where gold particles are recognized by local difference in the gray level intensity slider 2). Sensitivity of the sliders (given in maximal area occupied by the detected pixels) is set by combo boxes above them (the new parameter takes effect after activation of the corresponding slider). Actually, using each slider you set the area, which will be occupied by pixels of interest. Another important parameter is the size of the top hat, which is approximately half the size of the dots (gold particles – diameter in pixels) that should be detected by top hat. The option Remove background can partially compensate for uneven brightness among images in stack by lightening the dark images (adding constant value to set maximum intensity to 255). The pixels detected on the image are drawn on overlay image by color corresponding to the detection method (threshold, top-hat or both). The colors can be set by corresponding buttons (“Color Thr.”, “Color both” and “Color Top h.”). Point objects are then constructed in the center of mass of connected regions of detected pixels. Parameters for selection and classification of the points can be changed in the same window in property sheet “Objects”:  All parameters in this window are in pixels. In order to remove either too small or too large objects set the range of area values by sliders in the section “Select”. Use upper slider for small objects (slider 3) and lower – for large ones (slider 4). In combo box “Range” set the maximal size of an object (detected dark area) in pixels. Using the slider 3 set the minimal size of the object in the selected range and by the slider 4 – the maximal size. Objects can be then discriminated into (maximum) three groups according to their areas. In the section “Discrimination” set threshold levels by placing the sliders (ideally) under the valleys of objects area histogram (the upper slider 5 should be always left from the lower slider 6). In an optimal case, if classes of different size gold particles are well-defined, the area of histogram peaks would correspond to numbers of objects in each class. If the objects should not be classified into second or third class, the corresponding sliders should be set to rightmost position. Various classes of objects are drawn as crosses (small), triangles (medium) or squares (large): 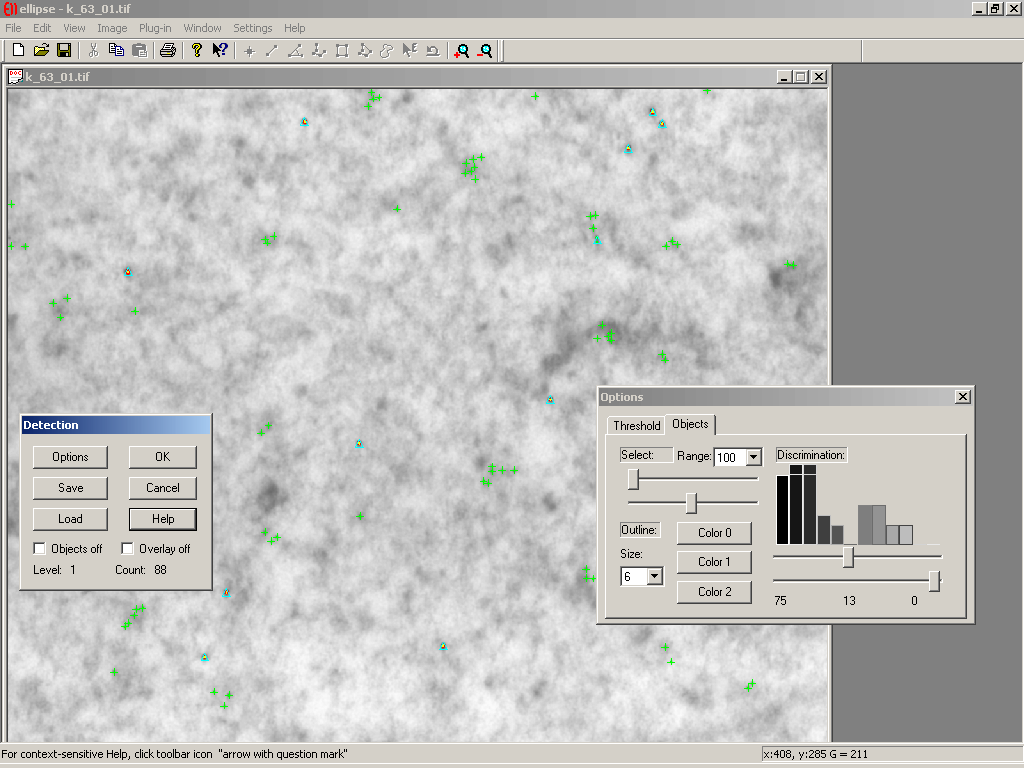 The detection is automatically updated, if the image in stack is changed. After pressing OK in the main window all the images in the stack are processed automatically and detected objects are transformed into Ellipse objects and the plug-in is exited. Cancel stops the execution of the module while discarding the detected objects and settings. All parameters can be saved to and loaded from file (use “Save” and “Load” buttons in the main window correspondingly), and are saved between executions of the plug-in (if exited by pressing OK) in registers of the computer. It happens quite often that the contrast or brightness of the set of images is varying and there is no setting of parameters that yields good detection in all images simultaneously. In this case, the images must be opened separately, the detection must be done with individual setting of parameters for each image and the results of detection must be stored separately in the objects files by File->Save Objects… Then it is possible to open all the images in stack and all corresponding objects files by module Plug-In>Ellipse>Objects>MergeObjects (use multiple files selection in the File Open dialog). The order of object files must be the same as the order of images. This can be achieved e.g. using the common prefix with appended numbers of fixed quantity of digits (e.g. as Image01.tif, Image02.tif, …, Image47.tif for images and Image01.txt, Image02.txt, …, Image47.txt for objects). Step 4. Select gold particles. In some images not all gold particles are detected automatically or correctly. In these cases you can mark gold particles manually using plug-in “SelectPoints”. Go to Plug-in>Ellipse>Gold>Selection: 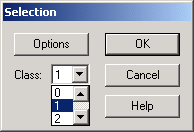 Maximum three classes of gold particles (0, 1, and 2) can be selected (combo box “Class”, X means no change). In the window “Options” the color and size of the markers (crosses, triangles or squares) for each class of gold particles could be changed using corresponding buttons (“Color0”, “Color1” and “Color2”) and combo box “Size”: 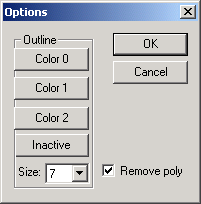 In order to mark points, close the “Options” menu and press the “Point” button in Ellipse toolbar:  Mark the objects of interest. When finished, press the “Point” button once more to switch it off. The points can be not only added, but also removed. You can do it separately (using the “EDIT” tool of the Ellipse program) or in batch – if you have drown a group of polygons whose inner parts delineate areas of interest drawn on the picture, objects outside the area are removed after exiting the module by pressing OK. The polygons can be edited by Ellipse tools Polygon, Freehand and Edit also during the execution of the plug-in. The points to be removed are plot by different color (parameter Inactive color in dialog Options). The polygons are removed after exiting the module, if the parameter “Remove poly” in dialog “Options” is set (in case they are not intended for further use, e.g. in module Colocalization). You can also remove all selected or previously detected points just by selecting the small area that does not contain any marked objects. Step 5. Set the image calibration. Go to Image> Calibration> Distance: 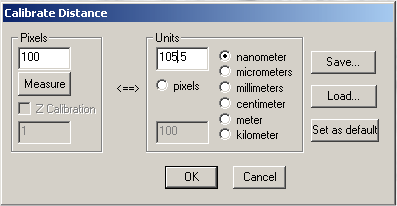 Choose the pixel values and corresponding units in accordance with the parameters of your images. You can also save and load your settings. Press OK. Step 6.1. Detection of clustering and colocalization. Go to Plug-in>Ellipse>Gold> Colocalization: 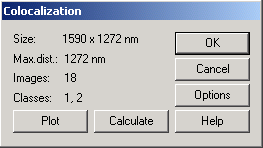 In the opened window press “Options”: 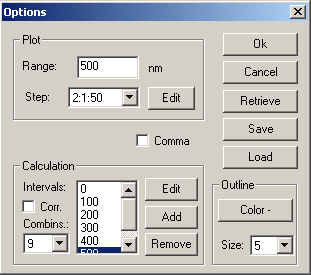 In the section “Plot” input the range of distances between gold particles, which is of interest for you (the “Range” parameter). Select the width of histogram bars: in combo-box “Step” select it either for clustering of particles of type 0 (0:0) or type 1 (1:1) or for colocalization of 0 and 1 (0:1), (also 2:2, 0:2, and 1:2, if there are 3 classes). In the section "Calculation" input the intervals of interest by adding or removing a new interval or editing the existing one. Also select the number of combinations (interval variants, combo-box “Combins.”) for the selected intervals (e.g. if you want to select not only consecutive intervals, but also the combined ones, i.e. not only e.g. 50 – 100 nm, 100 – 150 nm and 150 – 200 nm, but also 50 – 150 nm, 50 – 200 nm and 100 – 200 nm). All parameters could be then saved to and loaded from file (use “Save” and “Load” buttons correspondingly), and are saved between executions of the plug-in (if exited by pressing OK) in registers of the computer and retrieved by a button Retrieve in the Options dialog. Return to the main plug-in menu by pressing OK. Press “Plot” in order to see a preview in “Gnuplot” After exiting “Gnuplot” the program will place all the histogram data into an opened “Notepad” window. Thus if you need to work further with these data, copy them to an “MSExcel” or some other worksheet program. In order to check the intervals at which clustering or colocalization is significant, press “Calculate” in the main plug-in menu. The program will place all the histogram data into an opened “Notepad” window. Practical recommendations: - the limit of the interval of interest should be less then the shorter side of the window. - the pair correlation and cross-correlation functions should be used for exploratory analysis; in other words, these functions presented in histograms inform the user if there is any clustering or colocalization, and at what distances. As a consequence, the user can estimate the upper limit of the interval of interest for K functions (d in histograms). This should prevent one from an omission of clustering or colocalization at shorter distances. - the interactions of gold particles, antibodies and the antigen can vary at very short distances depending on antibody type, gold particles size, direct or indirect immunogold labelling, etc. The user should consider therefore very carefully the interpretation of results at distances shorter than 30 nm. Furthermore, the method is not appropriate for detection of clustering or colocalization for distances shorter than the maximal size of the immunogold, i.e. about 15 nm for 5 nm gold particles, and about 25 nm for 10 nm gold particles. - the densities of gold labeling used for testing the method (about 20 – 100 gold particles per square micron) appear to be entirely sufficient for the efficient detection of clustering or colocalization patterns. Much lower densities can be also used, however, this needs to be compensated by higher number of evaluated windows. However it should be noted that higher densities always give more significant results than very low densities compensated by higher number of evaluated windows. Step 6.2. Mapping of subcellular and subnuclear structures. Go to Plug-in>Ellipse>Gold>Mapping: 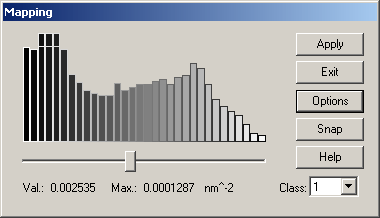 The plug-in allows one to outline the regions with increased spatial intensity of the detected points (Ellipse objects of type Point), classified to (maximum) 3 classes. In other words, it paints areas in the picture that are significantly labelled. The plug-in works with calibrated images, either single or in stack. Select class of objects (i.e. size of particles of interest; combo-box “Class”). The plug-in will immediately detect all regions with increased spatial intensity of the detected points of corresponding class and creates a histogram of density values. Using the slider set the threshold value. In optimal case, if there are clearly visible areas differing in label density, there are two peaks, corresponding to background and foreground. In that case, the slider should be set to values in the valley between the peaks. Isolines of estimated intensity are plot and then can be transformed to Ellipse objects of appropriate class by pressing “Apply” button. Image with point pattern and isolines can also be saved into file (“Snap” button). All parameters can be saved to and loaded from file (use “Save” and “Load” buttons correspondingly), and are saved between executions of the plug-in (if exited by pressing “Apply”) in registers of the computer. The program uses estimation of spatial intensity of points of given class by smoothing the point pattern with conical or parabolic Kernel (kernel estimator) of given size (parameter “Kernel size” - the radius of the base of the cone or paraboloid in pixels). We recommend to use the cone Kernel as it gives more smooth borders, however it is more sensitive for some border “mistakes” (parabolic Kernel can be more useful in such cases). Go to “Options”: 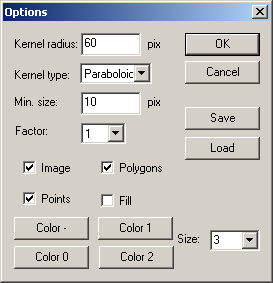 Degree of the smoothing (kernel size) must be high enough to remove random variation in the point density and low enough to reproduce shape of the labeled regions. We recommend to start with 50 pixels and then to increase or decrease “Kernel size” parameter until some “shapes” or objects will appear: just try a few options. Also set “Min. size” (minimal size of delineated objects in pixels) in order to exclude undesirable small objects. Finally, if you work with large pictures (e.g. 3000x3000 pixels and more) you can first make a preliminary estimate (or preview) of objects in your picture with lower precision using the combo-box “Factor”. Factor 1 means maximal precision as the plug-in works then with the full-resolution image. However, the larger the factor number, the smaller the resolution and the more coarse borders you will obtain (but the preview will appear much faster). You can also switch on or off the underlying image, objects (polygons) or points and fill the objects. The color will correspond to the color of the points of corresponding class. Try an example |